Create a self hosted cloud S3 storage with MinIO
Table of Contents
- Table of Contents
- Background
- Used Hardware
- Installing Ubuntu Server
- Preparing the data SSD
- Installing Docker
- Installing and Deploying MinIO
- Checking and Testing our MinIO server
- Conclusion
Background
Throughout my studies in data sciences I almost never had to really ask myself, how I would store my data. Either I had access to my university clouds and clusters either my models and dataset weren’t big enough for requiring any special solution.
However, as my university year are far behind and my personal project kept growing, the need for a more scalable and centralized data storage arose for me.
Obviously, I could rent a some cloud storage and use it in an optimal manner, keep my data on the cloud only for the duration of my projects and spend a few cents for that. But let’s face it:
- I want to have full control over my models and data.
- I tend to forget about my projects for months or even years, so I don’t want to pay for storage during downtime.
- I enjoy those rainy Sundays spent setting up IT projects that I don’t necessarily need but find fascinating.
Figure 1: Overview of Amazon S3 and its features
Most of the MLops solutions I saw in the last years offered the possibility to store and load data from a S3 bucket. But you might think “What’s the point? We wanted to have our data stored locally, no?” And you’ll be right, that’s where MinIO come in place! MinIO is an object storage solution compatible with Amazon S3 cloud storage service, it’s released under GNU License and you can have a self hosted version of it. They even have a docker ready image! So we have it, a self hosted data storage, a reason to get our hands dirty and S3 kind of service.
Used Hardware
Deploying a MinIO server has some hardware requirements, we could check everything and do the stuff fully properly or simply read what we want and assume it will be fine with our hardware (I am the option B type of guy). Anyway, the most interesting me where the networking, memory and storage requirements. Quickly put together, with 16 GiB of ram we should be able to manage 1 Ti of storage and the higher the number of disk the lower the number of concurrent requests we can perform. Last but not least, minIO can be limited by the network speed so we should aim for the fastest Bandwidth.
Luckily, one of my old laptop has a Ethernet port and is running on 8 GiB of ram. So let’s use this one.
Installing Ubuntu Server
First of all, we will install a linux distro on the laptop. I don’t wanna waste any time here, so we will simply go for a simple Ubuntu installation. I will install Ubuntu server. At the time of the writing of this story, the last version of Ubuntu server is 24.04.2 LTS. So let’s download the iso and create an installation drive using Balena Etcher.
Once the iso downloaded and Etcher installed, simply connect a non important USB flash drive(creating an installation drive will overwrite all the data on your USB), and flash it with the downloaded iso.
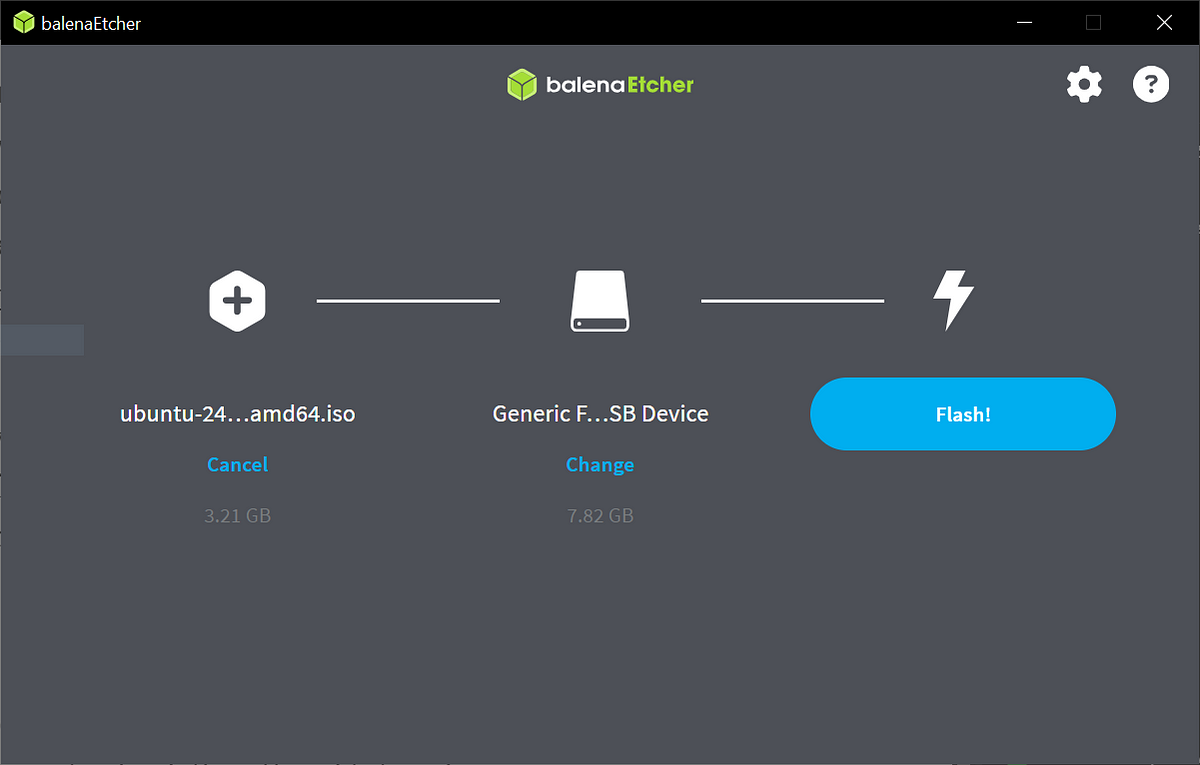
Figure 2: Etcher is ready to flash my USB drive
if you want a step by step well done and up-to-date tutorial on how to install Ubuntu, I invite you to check the official tutorial.
While installing, make sure to enable the Ethernet interface and to have an ip address (write down the ip address) and hold the installation for now.
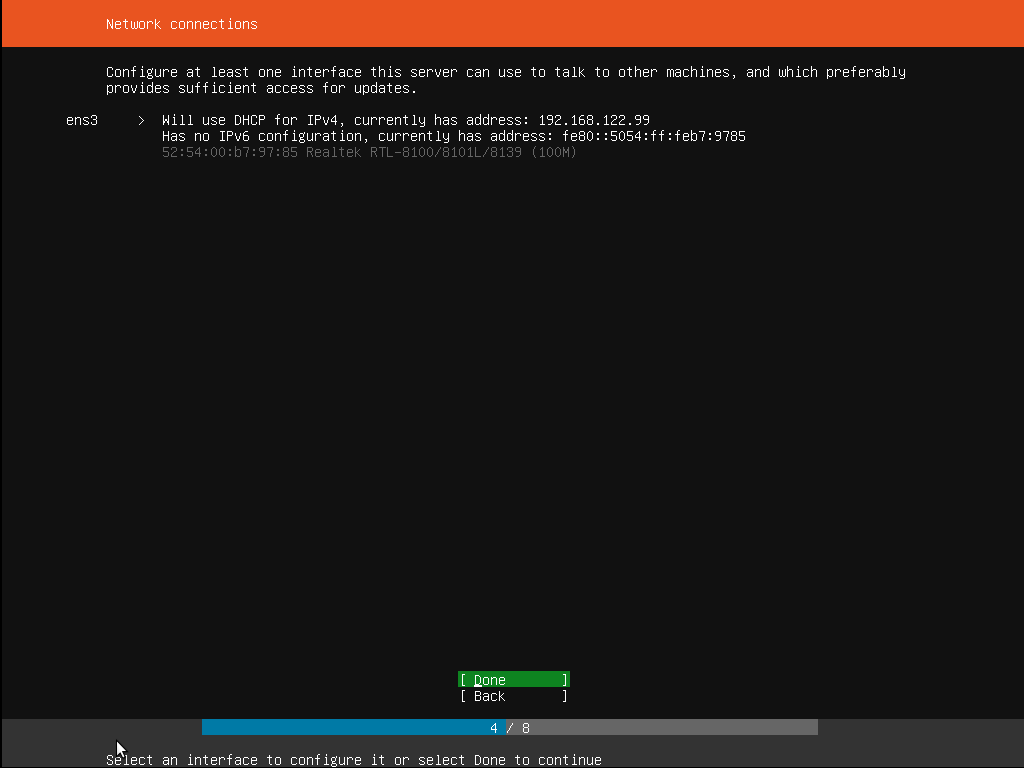
Figure 3: Configure your ethernet interface and write down your IP (source: Install Ubuntu Server | Ubuntu)
We will create some SSH keys on our working machines, push the public key to github and use them to connect to the laptop.
Now, open a terminal and run:
1
ssh-keygen
The terminal will ask you where you want to store the generated key, put the full path which should be something like “C:\Users<your_username>/.ssh/
Once the key generated, we want to push the public key on our github account. Go to the folder where your key is created, open the .pub key with your notepad and copy the content of the file.
Then, go to your github account to >settings>keys click on New ssh key select a title for the key, past the content of your .pub key and confirm by clicking on Add ssh key.
You should then be bring back to your key list and see the new added key.

Figure 4: A newly added key on my github account
Keep going with the ubuntu installation and you should reach a point where you can enable the OpenSSH service and grab your keys from github. Enter your github username, and it should find the new created key (you can check the sha). Once the key on the laptop, we can keep going with the installation of ubuntu. I’ll let you install it as you want, don’t install docker here tho as it will install the snap version of docker which restrict docker file access to the home directory. We will install docker later on.
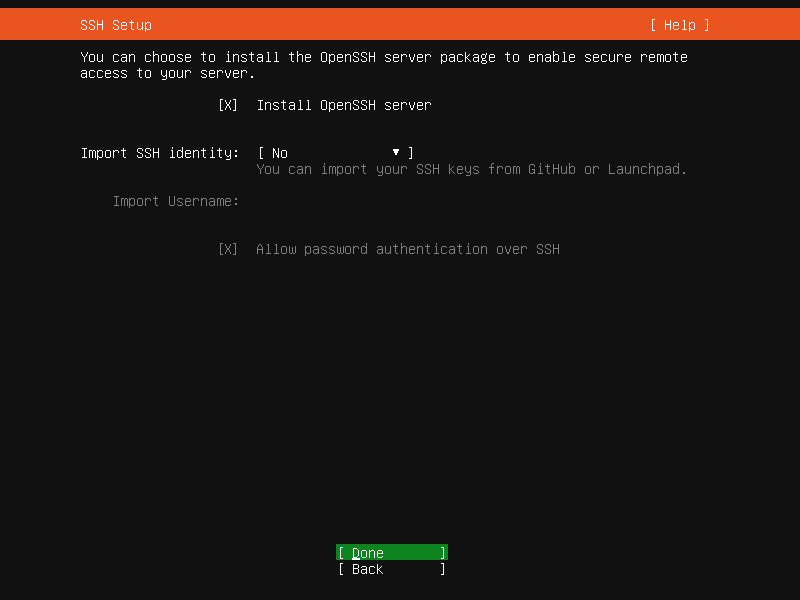
Figure 5: enable OpenSSH and import your pub key from github (source: Install Ubuntu Server - Isarsoft Perception Documentation)
Once done with the installation, you will see a prompt asking you if you want to reboot the system. Do it and remove the usb stick. The laptop should restart and be accessible over ssh.
Now we will connect to the laptop. On your working machine, open a new terminal and type:
1
ssh <your_username>@<the_laptop_ip> -i ~/.ssh/<key_name>
You could also use any SSH client you prefer, such as PuTTY, MobaXterm, or the VS Code Remote - SSH extension. However, since I don’t plan to connect to this server frequently, I’ll keep things simple and use a terminal.
First, I want to be able to close the lid of my laptop. So let’s edit the logind.conf.
To allow the laptop to keep running even when the lid is closed, we need to modify the logind.conf file. Open the file using the following command:
1
sudo nano /etc/systemd/logind.conf
Uncomment and edit the following lines to ignore the lid switch actions:
1
2
3
HandleLidSwitch=ignore
HandleLidSwitchExternalPower=ignore
HandleLidSwitchDocked=ignore
Save the file and restart the systemd-logind service to apply the changes:
1
sudo systemctl restart systemd-logind
Now, the laptop should continue running even when the lid is closed.
Preparing the data SSD
MinIO supports 3 deployment types:
- Single-Node Single-Drive (SNSD or “Standalone”)
- Single-Node Multi-Drive (SNMD or “Standalone Multi-Drive”)
- Multi-Node Multi-Drive (MNMD or “Distributed”)
For my use case, I will use the SNSD type and store everything on a single ssd for now. As I am not confident in running more than 1 drive with 8 GiB of ram.
Let’s prepare our ssd drive. According to MinIO documentation we should format it as XFS. To do so, we need to find the drive. Run a lsblk command on the laptop before and after connecting the ssd to know where it connects.
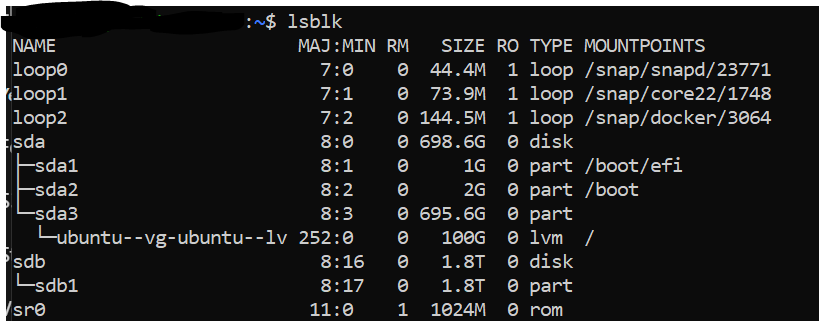
Figure 6: Here my 1.8T ssd is connected as sdb
We format the ssd as xfs and give it a label:
1
sudo mkfs.xfs -f /dev/sdb -L MINIODRIVE1
Now let’s check that we have a XFS drive by mounting it:
1
2
3
sudo mkdir -p /mnt/ssd #create a mounting point
sudo mount /dev/sdb /mnt/ssd #mount the ssd
df -Th #check the mounted devices
In my case, the sdb drive is indeed formatted in xfs:
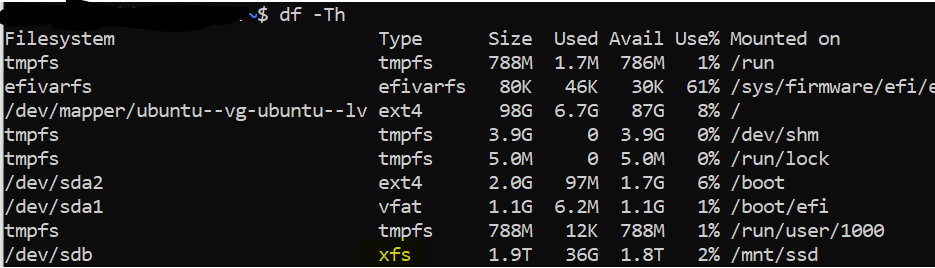
Figure 7: We got a XFS drive
We can umount the drive and edit our fstab to mount it at a consistent path.
1
2
sudo umount /dev/sdb
sudo nano /etc/fstab
Be really careful when editing your fstab. But overall you can add each of your drive as shown in minIO documentation:
1
2
3
4
$ nano /etc/fstab

# <file system>        <mount point>    <type>  <options>         <dump>  <pass>
LABEL=MINIODRIVE1      /mnt/drive-1     xfs     defaults,noatime  0       2
MinIO recommends to disable XFS Retry On Error and provides a script for that. Let’s create a file for the script:
1
2
sudo mkdir /opt/minio #creates the opt/minio folder
sudo nano /opt/minio/xfs-retry-settings.sh #creates and write in the xfs-retry-settings.sh file
and paste the script provided by MinIO:
1
2
3
4
5
6
7
8
9
10
11
#!/bin/bash

for i in $(df -h | grep /mnt/drive-1 | awk '{ print $1 }'); do
      mountPath="$(df -h | grep $i | awk '{ print $6 }')"
      deviceName="$(basename $i)"
      echo "Modifying xfs max_retries and retry_timeout_seconds for drive $i mounted at $mountPath"
      echo 0 > /sys/fs/xfs/$deviceName/error/metadata/EIO/max_retries
      echo 0 > /sys/fs/xfs/$deviceName/error/metadata/ENOSPC/max_retries
      echo 0 > /sys/fs/xfs/$deviceName/error/metadata/default/max_retries
done
exit 0
We can add the script to cron (I like to use nano as my editor). Run the following command to open a cron tab:
1
crontab -e
and past the following at the end of the file:
1
@reboot /opt/minio/xfs-retry-settings.sh
We can make sure that everything went well by rebooting the laptop:
1
sudo reboot
SSH again to the laptop and (if your fstab isn’t broken) you should be able to connect. You can also df -Th again and make sure that the ssd is correctly mounted.
Installing Docker
Now we can install docker properly. I will follow the official docker installation guide(https://docs.docker.com/engine/install/ubuntu/) for Ubuntu.
First, we make sure that there isn’t any old version of docker installed:
1
 for pkg in docker.io docker-doc docker-compose docker-compose-v2 podman-docker containerd runc; do sudo apt-get remove $pkg; done
Now we setup the apt repository:
1
2
3
4
5
6
7
8
9
10
11
12
13
# Add Docker's official GPG key:
sudo apt-get update
sudo apt-get install ca-certificates curl
sudo install -m 0755 -d /etc/apt/keyrings
sudo curl -fsSL https://download.docker.com/linux/ubuntu/gpg -o /etc/apt/keyrings/docker.asc
sudo chmod a+r /etc/apt/keyrings/docker.asc

# Add the repository to Apt sources:
echo \
  "deb [arch=$(dpkg --print-architecture) signed-by=/etc/apt/keyrings/docker.asc] https://download.docker.com/linux/ubuntu \
  $(. /etc/os-release && echo "${UBUNTU_CODENAME:-$VERSION_CODENAME}") stable" | \
  sudo tee /etc/apt/sources.list.d/docker.list > /dev/null
sudo apt-get update
And we can install docker:
1
 sudo apt-get install docker-ce docker-ce-cli containerd.io docker-buildx-plugin docker-compose-plugin
We can check that everything went well by running:
1
sudo docker run hello-world
If everything went well, you should see a message saying that the installation was successful.
1
2
Hello from Docker!
This message shows that your installation appears to be working correctly.
Installing and Deploying MinIO
Now we can install and deploy the docker version of MinIO. As always, most of the information are available on MinIO website.
First, we need to install docker-compose. You can do this by running the following command:
1
sudo apt-get install docker-compose
Then we need to add our user to the docker group. This will allow us to run docker commands without using sudo. You can do this by running the following command:
1
2
sudo groupadd docker
sudo usermod -aG docker <your_user_name>
you might need to reboot afterwards. Now, let’s create a folder to store our docker compose and write it:
1
2
mkdir -p ~/docker/minio && cd ~/docker/minio
nano docker-compose.yml
Here’s the compose file:
1
2
3
4
5
6
7
8
9
10
11
12
13
14
15
16
version: '3.8'

services:
  minio:
    image: minio/minio
    container_name: minio
    ports:
      - "9000:9000"
      - "9001:9001"
    environment:
      MINIO_ROOT_USER: "your_minio_root_user"
      MINIO_ROOT_PASSWORD: "your_minio_root_password"
    volumes:
      - ~/mnt/drive-1:/data
    command: server /data --console-address ":9001"
    restart: always
once the compose file written, we can start the minio service:
1
docker-compose up -d
If everything went well, you should be able to access the minIO UI from your browser just try to connect to

Figure 8: The login page of minIO
That should be already good, but let’s keep going by creating a new user, a bucket and connect to it using python.
First we login with our root user and password.
Then on the left panel, you can click on Identity > Users > and create a new user. For our use case, we simply need the read/write policies.
We could create a bucket from the web UI and upload data from here as well. However, as a “data scientist” I am more into making everything with python. So I’ll let you explore the web UI by yourself if you feel so.
TODO show a nice animation of creating a bucket and uploading data from the web UI
Checking and Testing our MinIO server
MinIO has a python sdk. Install it on your working machine with:
1
pip3 install minio
Then we can write a quick python script to connect to the minIO server, create a bucket and upload some data.
We will need an access key to the MinIO server. Connect again to the web UI with your newly created user and go to “Access Keys” on the left panel. From there, you can create a new access key. You don’t really need to customize the setup if you don’t feel so, simply click on “create” to generate the access key.
You will get a pop up showing your access and secret key. Copy those and put them somewhere safe or simply download the provided json file.
We will create a new bucket and upload the iris_data set to it as a csv. We can grab the iris_data from scikit-learn, so let’s install it:
1
2
pip install scikit-learn
pip install pandas
The following script should then deal with everything else:
1
2
3
4
5
6
7
8
9
10
11
12
13
14
15
16
17
18
19
20
21
22
23
24
25
26
27
28
29
30
31
32
33
34
35
36
37
38
39
40
41
42
# Import the required libraries
from minio import Minio
from minio.error import S3Error
from sklearn.datasets import load_iris
import pandas as pd

# --- Replace with your own MinIO server and credentials ---
MINIO_URL = "your_minio_url:port"
ACCESS_KEY = "your_access_key"
SECRET_KEY = "your_secret_key"

# create a MinIO client with the MinIO server information
client = Minio(MINIO_URL,
               access_key=ACCESS_KEY,
               secret_key=SECRET_KEY,
                   secure=False  # Set to False if not using SSL
)

# Create bucket.
client.make_bucket("toybucket")

# Load the Iris dataset
iris = load_iris()

# Convert it to a pandas DataFrame
df = pd.DataFrame(data=iris.data, columns=iris.feature_names)
df['target'] = iris.target

# Save the DataFrame as a CSV file
df.to_csv('iris_dataset.csv', index=False)

# File to upload
file_path = "iris_dataset.csv"  # Path to the dataset file you created
bucket_name = "toybucket"
object_name = "iris_dataset.csv"  # The name to give the file in the bucket

# Upload the file to the MinIO bucket
try:
    client.fput_object(bucket_name, object_name, file_path)
    print(f"File '{file_path}' uploaded to bucket '{bucket_name}' as '{object_name}'.")
except S3Error as e:
    print(f"Error: {e}")
And that’s it! Go back on the minIO web UI and check for the created bucket. You should see the toybucket with 1 object in it.
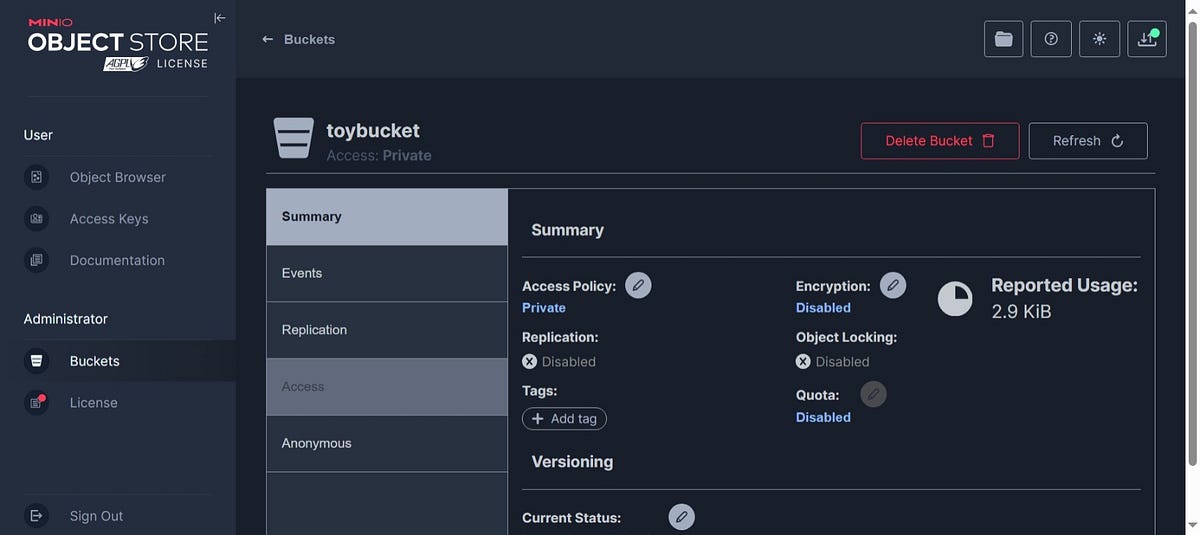
Figure 9: my toybucket with the iris_data set inside
Conclusion
obviously the overall goal wasn’t to simply push some iris_data on a 2TB SSD, but it could be a good solution for something like a homemade MLops server.
You can find all the code used in this story here